I thought it might be kind of fun to make a Generative Design (GD) solution for holding SD/microSD cards…so that’s this :)
Setting up the Constraint Points
My favorite part about designing with GD tools is how beautifully it ties in with the principles of Exact Constraint/Kinematic Constraint, which have long been central to precision engineering applications (my ‘day job’ for most of the last ten years). It really creates a great opportunity to think about a design purely from a standpoint of constraints, loads, and keep out zones.
But anyway, aside from my fondness for playing around with these tools in general, back to playing around with them for an SD card holder specifically! The below sketch shows the rough concept for constraint points that I’m thinking for supporting the SD cards. And yes, I did put gravity pointing up…deal with it, orientation is a concept :) have you read Ender’s Game….if not, trust me, that isn’t THAT random of a connection…SOOO good!..what were we doin? Oh, yeah, SD card, got it. Yeah, 6 support points, 6DOF…checks out!
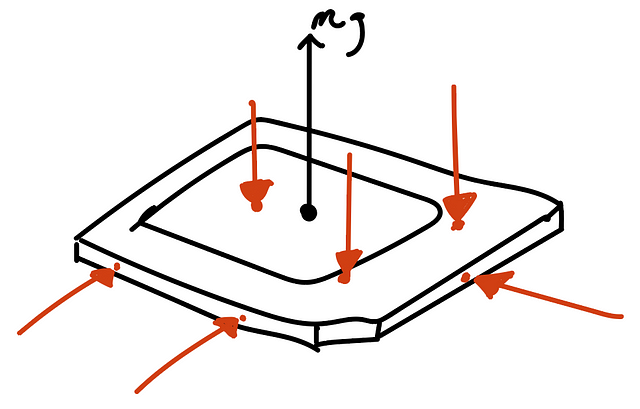
Because this is just for sitting on my desk, and I’m not intending to use this at all for transporting cards or the like, I’m actually not going to preload the cards into this constraint set (shocked gasps!) I’m ok with them jostling around a bit within their respective homes, so essentially what I’m going to do is just mirror that constraint set shown but with liberal clearances.
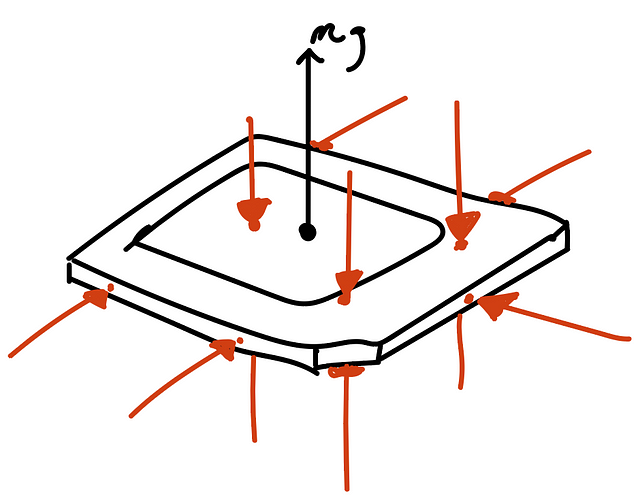
And here is the ‘one half’ constraint set implemented as solid bodies in Fusion360. One difference here is that I’ve added an additional constraint on the ‘side’ (the three column-lookin fellas there on the right). The further these side contacts can be spaced apart, the better the constraint against rotation around my lil mg vector shown above. So I wanted a constraint as close to the end of the card as is feasible, but my concern was that for some cards or some print conditions, this contact may not happen as intended, and so the redundant contact in the center was added.
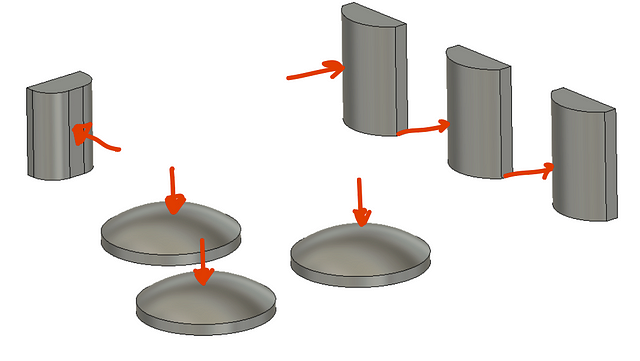
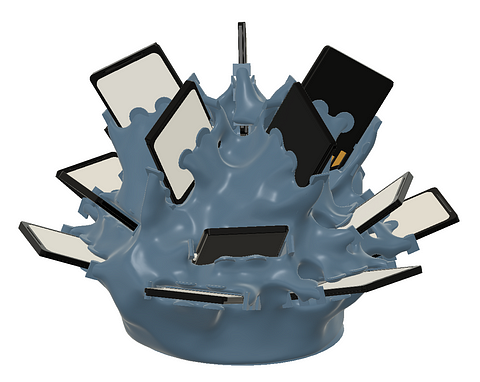
And here is the full constraint set for a single card…you can mentally (or physically, have fun) draw your own force vector arrows :)
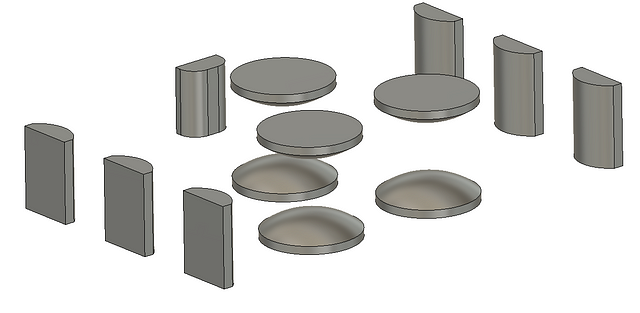
I then created a ‘keep out zone’ body. I just went with a simple block that fills the full tolerance/clearance zone for the SD card. I then put a simple flare out for access to grab the cards.
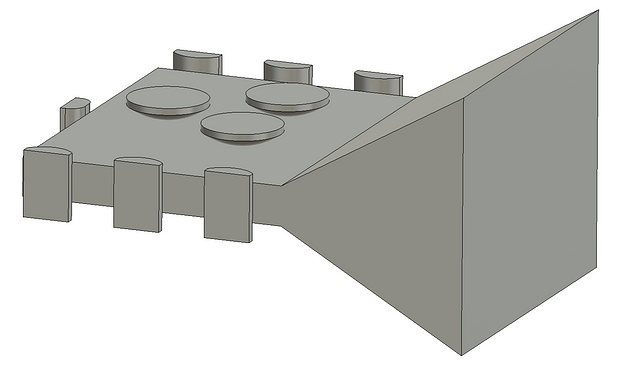
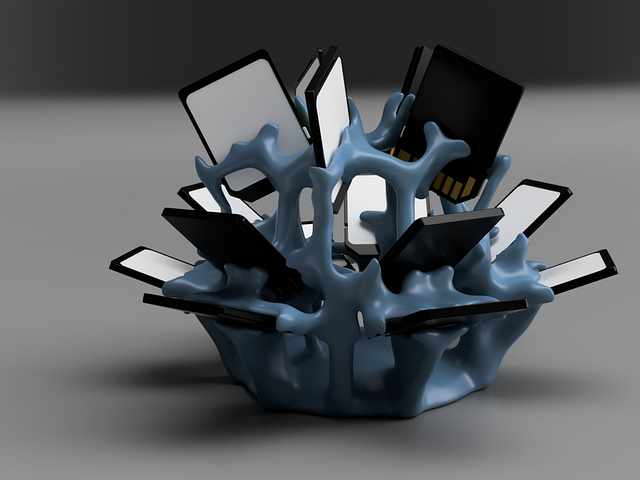
Alright! Off to the GD fun!…Oh, wait, a single SD card isn’t exactly ideal….so I did some patterning…from here on it’s a BIT of an eye sore…you’ve been warned…
Once all of the elements were populated, I moved to the fun of applying loads and constraints to this cluster…didn’t really think through the downsides of designing something with GD that is holding lots of discrete parts :)
The only load case I applied was for a static loading, but I did significantly ‘overload’ it a bit. I applied a normal force to every one of the interface bodies shown above, and applied a 6DOF fixed constraint to the base.
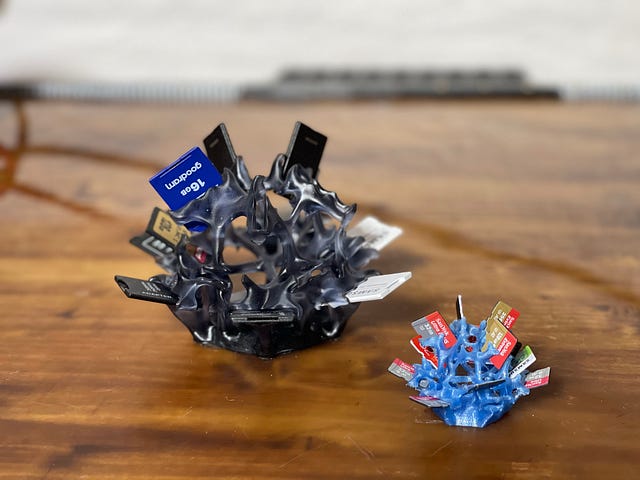
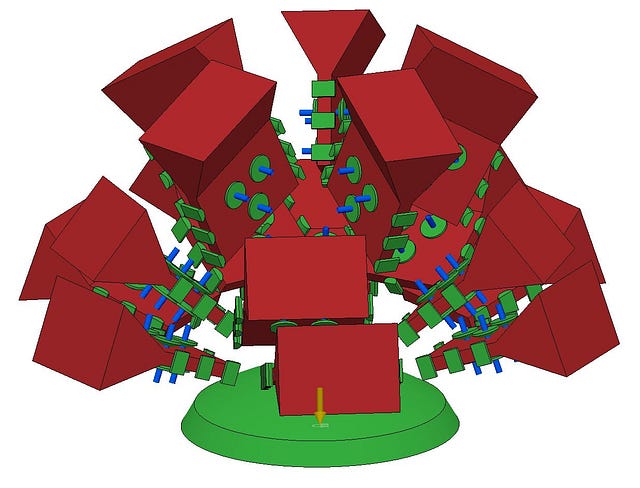
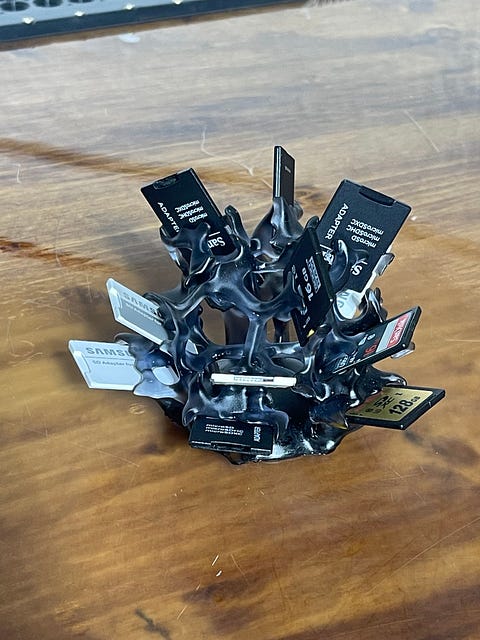
Unfortunately, it appears I ran another simulation on this file and can’t access the previous version….? 🥺 So I don’t have the full set of results from this run to show (and my license expired this week, twas fun while it lasted!), but here are the two versions that I saved and ultimately printed:

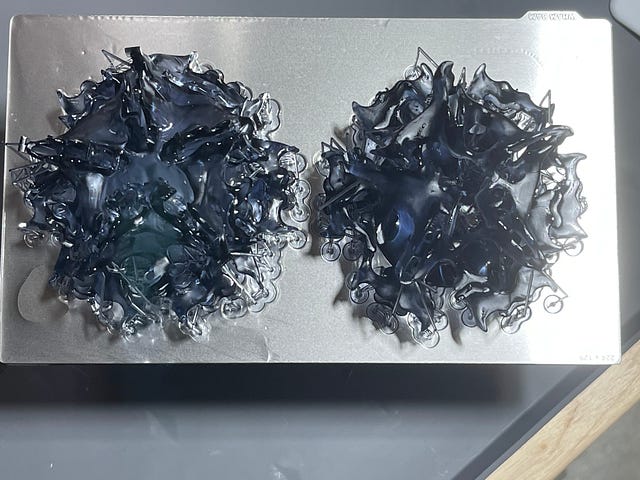
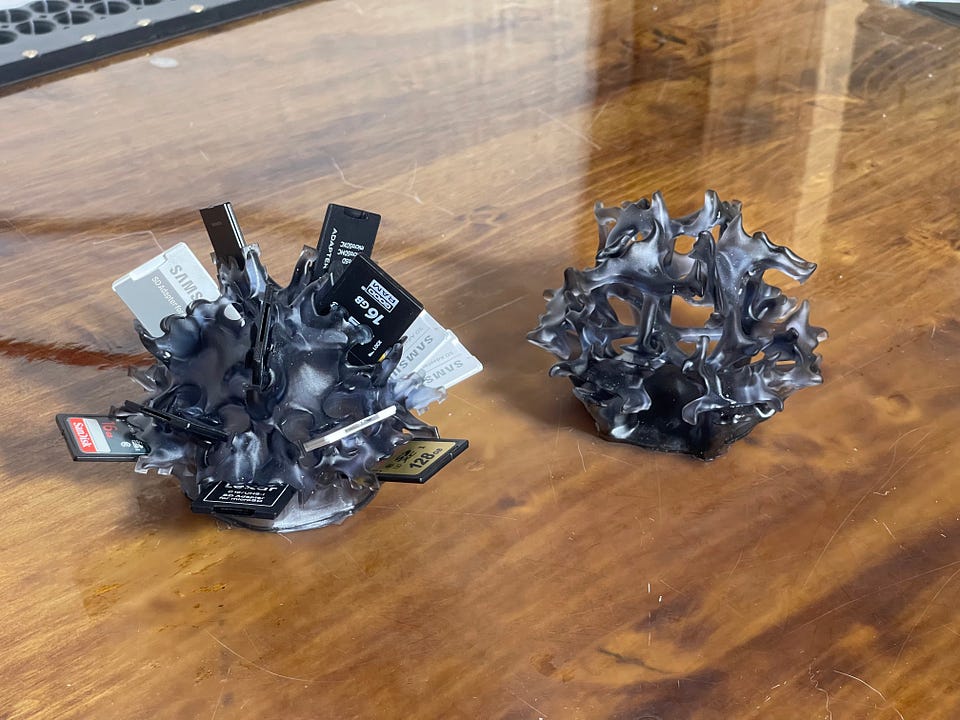
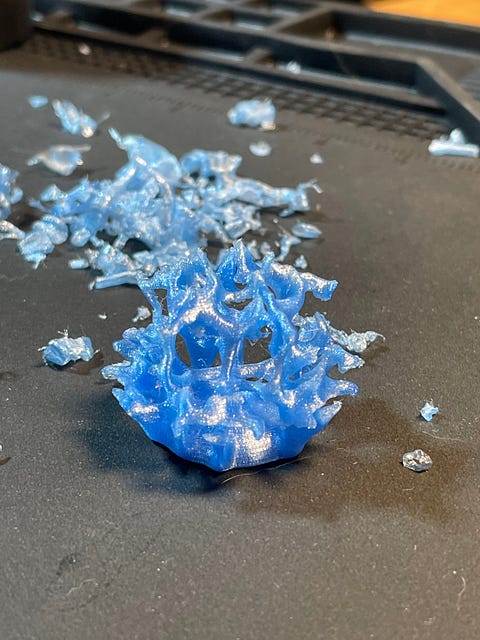
Here they are as amorphous blobs, fresh out the vat! They (roughly) line up with their respective modeled versions above. These were printed in Siraya Tech Fast — Smokey Black (pretty much my go to resin these days for ‘just works’ prints) on my Elegoo Saturn 8k (yes, I bought this AFTER the Saturn 2 came out…actually, I’ve bought two of them since the release of the 2. I personally just prefer the form factor and the capabilities seemed identical ¯\(ツ)/¯).
Oh, and quick aside, but if you print with resin and HAVEN’T already switched to flexible build plates…bruh….why??? :) Seriously though, Prusa, good on you for setting this standard, it is such a game changer to me!
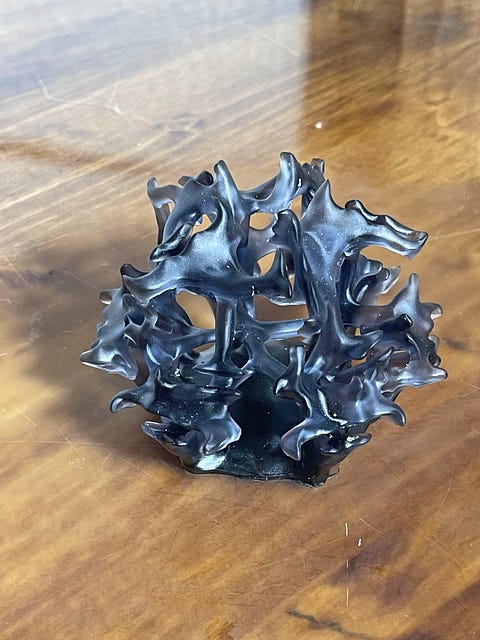
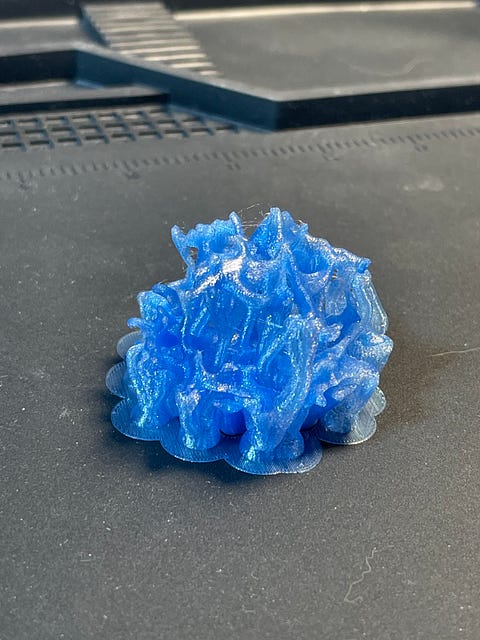
And here’s one scaled down to 46%, makin it a microSD card holder and printed on my Mk3s+ with a 0.25mm Revo nozzle on it. It’s printed in this PETG from a brand I hadn’t tried before. I bought three colors; the blue that the print is in, their transparent red, and the clear. They all have printed nicely, but the blue has hung around the longest and I’m pretty sure it’s taking up water pretty aggressively (and starting to get stringy)….hold on, what were we talkin about? Oh, right, the SD card holder…actually, I think that’s all I’ve got really on that :)
CAD models for the SD cards: Thanks for the nice card models!
Exact Constraint
If you’re interested in getting a quick handle on the concepts and examples in Exact Constraint, this book is the one I keep handy and always recommend to new folks in precision work.
Flexible Build Plates for resin printing
I have three resin printers, and I’ve put these on all three of them….come on Elegoo, can you please just do me a favor and toss these on at the factory??? They’re spring steel sheets, like what you’d find on a Prusa (since Mk2…I think?), but just clean stainless, sometimes with an etched or otherwise patterned surface.
I’ve used Wham bam (the regular, not the XTR versions), for all three of mine, but I’m very curious to hear comments from anyone that’s used the ‘generic’ versions these available at Amazon and the like.
The kits come with a magnetic plate that you adhere to your existing build plate surface. It’s USUALLY pretty straightforward (or at least it has been on the Saturn and Saturn 8k), but on one machine I did run into a problem where the addition of the magnetic plate caused the homing sensor to not be able to get within range. The fix was quick and easy, I just designed and printed a longer homing trigger. BUT if you don’t have a second printer handy, this could be a huge PIA! Once the magnetic plate is on, it’s not comin off easily! So I’d recommend doin a little googlin on your specific printer model just to see if there might be anything you’ll want to have printed prior, just in case.